

Steampunk Metal Octosub Pirate Hat
- Jan 10, 2013
- 7 min read

I found a tutorial online and decided to use some of the ideas to create something new. You can find the original here: Cardboard Steampunk Top Hat Tutorial
Materials:
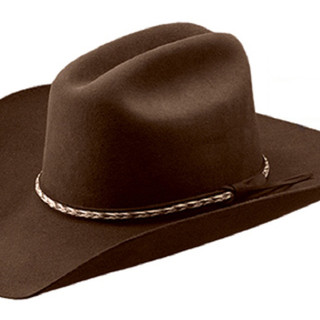
Old cowboy hat
Glue gun and glue
Card stock paper or thin cardboard
5 minute epoxy
Contact cement
Hammered Metallic Brass spray paint (all purpose)
Gel Stain Black
Clear Acrylic Sealer
Ship kit or home decor ship
Flat washers
Wood screws (attach ship to hat)
First you will need to find or purchase a used cowboy hat. I was lucky enough to find a wool felt hat on the side of the highway is perfect condition. I cleaned it and found the hat to be a little loose on my head but that worked as I planned to use a pirate wig underneath.
You will need to steam crease the brim edges to form a three point hat. I have a tea pot so adding water, letting it boil so the steam can rise and steam the hat. I kept moving the hat off the steam and pinching the corners. I also used chip clips to hold the creases. I also pushed in the top of the hat to make room for the ship. Once the hat has three points and curved top- you can start cutting cardboard squares.
If you do not have card stock on hand you can use cereal boxes and other thin cardboard materials and cut them into random squares and rectangles. Apply contact cement to a portion of the hat, then apply the contact cement to the backs of a bunch of the cardboard cutouts. With contact cement you apply it to the separate surfaces, and then let both surfaces get dry to the touch( about 5 min) then put them together, creating an instant bond. Make sure to overlap the pieces. If you do not have contact cement, you may also use tacky glue.
Make sure all areas showing outside the hat is covered and the entire brim.
The weight of the hat will cause the brim to go flat so you will need to make sure the three points still stay together as it dries. While the hat dried I used some twine to tie the edges up. I did not tie the twine tight so not to make a strange crease from the twine.
Making the rivets: There are two ways to make them. I have tried both and either way will work but the glue

gun stick rivets tend to peel off after awhile if you are not careful. All you do is heat the glue gun and make little dots of the melted glue sticks on to the cardboard pieces. For something that lasts a little longer I suggest the two part 5 minute epoxy, and mix up a little batch. Using a stick or something with a rounded end, dip it in the epoxy and then on the cardboard, leaving a small raised dot on the cardboard. Keep doing this until you have traced the overlapping edge of all sheets of cardboard. You will have to figure out how much is the right amount of epoxy to mix, that you can use before it sets. You will end up mixing lots of batches of epoxy by the time you are finished.
Once the rivets dry you may decide if they need to be a little higher. If you think they need to stand out more, you can do the process over again or just begin the painting process.
Paint: I found the hammered brass metal spray paint works great. It already has a texture built in and so can get it in a silver or brass. I took the hat outside and sprayed it lightly then let that dry and did a second coat on the outside then once that was dry I repeated the process on the inside to make sure the brim was fully covered. If you so not want the head portion of the hat painted, you can place a plastic bag inside, let it dry then remove the plastic so the inside can stay soft. I gave the hat 6 hours to day while set on a post so all areas could dry evenly.
I placed a dab of black gel stain on an old rag and wiped over the hat just leaving enough stain to fill in around the edges and rivets. Let the gel completely dry then spray a light coat of clear acrylic sealer over the hat.
Tip: If for any reason you cannot find black gel paint, you can add some black acrylic paint to walnut gel stain a little at a time till you get the look you want. Make sure it is completely dried before you spray with the sealer.
The ship: I was given a home decor ship that sits on a wooden base. The first thing you need to do is remove the base. Mine was glued on so I use a model knife to loosen the glue and pull the base away. I marked the distance from each post and made two holes in the top of the hat. I used my Dremel tool to drill small holes into the bottom of the ship posts. I placed washers on the inside of the hat and screwed in the wood screws into the posts to hold the ship in place on the top of the hat.


Octosub Materials:
Ball Float
PVC Plugs
5 minute epoxy
Variety of Gears
Antique brass mounted propellers 22mm
Brown Metallic spray paint
Black gel stain
Wood screws
2Nuts and Bolt Screws
toothpaste lid
Steampunk Screws
Jewelry Chain
2 ring handle embellishments
Ostrich feathers
Mini Metal Paper Fasteners
Ruffle and flat trim
Black grosgrain trim
Black
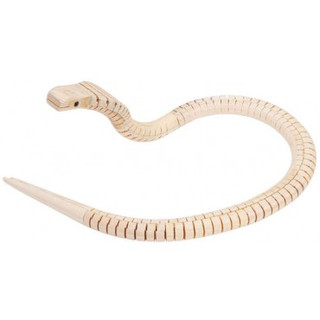
Wooden Snakes with Joints (8 Pieces)
Wire
Battery-operated mini lights
Black Elastic Thin Band Trim
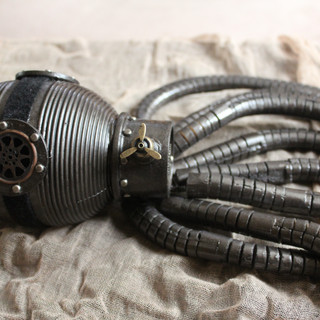
The Octosub: The important thing is the PVC plugs need a lip so when you cut the 2 holes in the ball float it will create windows. I had to cut the PVC so there was just the lip and a tiny bit of the pipe to slide the PVC into the holes. I used the two part 5 minute epoxy to make sure the two windows stayed in place. I also added another PVC piece to the end of the ball float. I found a toothpaste lid and glued it to the side then spray painted the entire piece a dark brown metal. I also added a 2 inch hole in the back that will be covered later. This part will go toward the hat so make sure you make a hole that cannot be seen from the front.
Once the ball float it dried I started to decorate. I placed gears over the 2 PVC lips to create fancy windows.
I used Mini Metal Paper Fasteners to make rivets around the windows and other places for decoration. I had to cut off the fastener part so they were flat enough to glue on. Where the toothpaste lid is glued, I added a propeller and also added one inside on top of some gears I had glued onto the ball float. I placed a strip of black grosgrain ribbon on the ball float. On the next one I make I plan to add a strip of cardboard that I will paint silver and rivet but for a first time project I think the ribbon works.
The Octosub Tentacles: I removed the heads of the snakes. Each snake body had wire inside so I used wire to wrap each piece together and make it so I could still move the tentacles as needed. Once they were attached to the wire I sprayed the snakes with the brown metallic paint then turned them over to spray the other side. For a more mechanical look you can add rivets to the joints. Mine are not pictured with the added rivets. I later used the silver mini metal paper fasteners. I removed the fasteners so I could glue on the flat metal to the snake tentacle joints. I only placed them in the areas you could actually see the metal rivets.
Attaching the sub to the hat: I made a hole in the hat that goes through the pointed brim towards the back of the hat and made a smaller hole next to the sub 2 inch hole. I used the nut and bolt. The larger hole was to get the nut on the bolt. This was a complicated process but once the bolt was tightened I took the mini lights and placed them in the hole and placed the battery pack into the back of the hat. I used some grosgrain ribbon to make a holding strap inside the back brim. This allowed me to get inside the battery pack to replace the batteries and turn the lights on but also hold the battery pack in place.
I made a multi loop from the black and gold ribbon trim and added it in front of the tentacles. I tied the tentacles to the bolt and used epoxy to hold the wire in place. The ribbon hides the wire but also adds to the look of the ship. I used hot glue to add the antique white ruffle trim to the hat. Once everything was in place I could decide where the tentacles would go. The tentacles I wanted to look like they were going into the hat I cut off the tail with my Dremel tool then drilled small holes in the tentacles I went inside the hat and used wood screws to attach the tentacles to the hat. The rest were wound around the ship and glued inside the brim where they would not be seen. I added a few feathers and found 4 mini handle embellishments with rings so I placed jewelry chain on the rings and glued them to the Octosub.
This is a semi-heavy hat that is not balenced due to the octosub on one side. I wanted it to stay on my head so I placed pinned elestic inside the hat (about 1 inch) then placed the wig on my head and the hat. I ran the elastic trim between the wig and back of my head to the other side of the hat. I stretched the elastic to a comfortable point where I could place the elastic on the hat and used a pin to mark that point. I removed the hat and wig then attached the elastic inside at each side by sewing them in place. Once I had it complete I placed the hat on the wig and placed that on a wig head. I was able to move the elastic strap between the wig pieces so the straps would not show. When wearing the hat and wig I merely used bobby pins to cross over the straps and go through the wig to my hair to keep the hat and wig in place for an entire event without any adjustments.
Save
Save


Comments